Reexamining the First Barbary War through a solo play of The Shores of Tripoli

American interception.

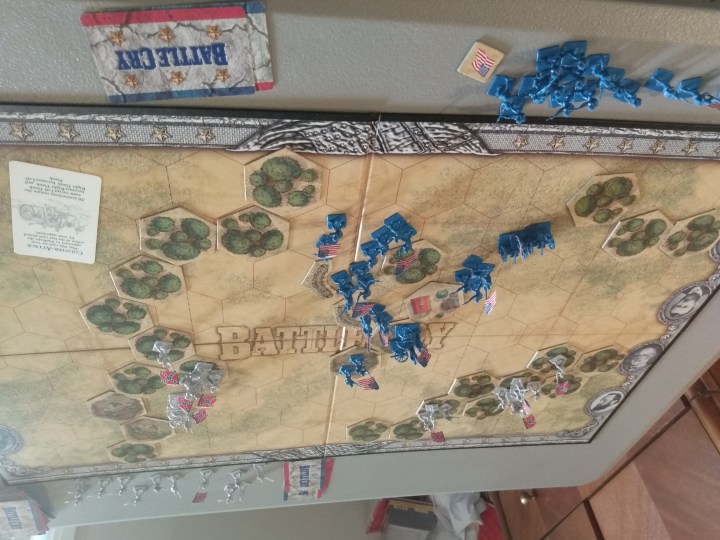
One of my favorite things with historical games is when they get you to really think about what did happen, and why, and what might have happened instead. Back in 2020, I looked at the Battle of Chancellorsville through its Battle Cry scenario. Now, in a similar vein, here’s a look at one particular solo session of The Shores of Tripoli, which I played Sunday morning.

First, a little background. The Shores of Tripoli was first published in 2020, by designer Kevin Bertram through his own Fort Circle Games. It’s a one- to two-player game that takes about 45-60 minutes, as per its BGG page, and that timeframe seems accurate based on my plays. It focuses on the First Barbary War, largely a conflict between the United States and Tripolitania (with some additional involvement from Sweden, Morocco, Algeria, and Tunisia) that historically ran from 1801 to 1805 (although the game can run through 1806).

This is an asymmetric card-driven game, with both sides having unique decks. It takes place over up to six years from 1801-1806, and each year has four turns for each player, divided by seasons. On each turn, the active player will play a card, either for the listed event or as a discard for a basic always-possible action. The U.S. player always goes first. The Americans win either by successfully playing “Treaty of Peace and Amity,” which requires three separate conditions, or by successfully invading Tripoli itself. The Tripolitanians win by gaining 12 gold through pirate raids and card play, sinking four U.S. frigates, or eliminating a U.S. land army.  If neither side hits its conditions by the end of 1806, the game is a draw.

I quite like The Shores of Tripoli, especially for the different stories it tells with each play. The event cards, and when you happen to draw them or how their use goes, do a nice job of illustrating the various possible permutations of this conflict, as I discussed in my segment on this game (and other plays from the January 2021 Armchair Dragoons Digital Convention) on Whatcha Been Playing Wednesday #3).  The components are beautiful, evocative, and functional, and the game has lots of strategy without lots of rules overhead or a long playtime. It also uses “buckets of dice” to good effect in smoothing out probability curves (something discussed by Kevin in a recent Connections Online panel, and discussed by fellow panelist Amabel Holland in a follow-up Twitter thread), which makes reasonable outcomes probable but not certain.

The Shores of Tripoli is available for free online play at Rally The Troops!, and there’s currently a tournament ongoing there. In fact, preparing for my next tournament games (go Team Shadow Dawn, where I’m paired with excellent game designers Sobhi Youssef, Joe Schmidt, and David McDonough) motivated me to dig out my physical copy and take on the T-bot to see if I could improve my U.S. strategies. (The standard two-player game sees one player controlling the Americans and one controlling Tripolitania, but the solo version sees a human U.S. player facing a bot-controlled Tripolitania.) Here’s a look at how that went through photos (an approach inspired by Hiew’s Boardgame Blog):

Shores of Tripoli setup.

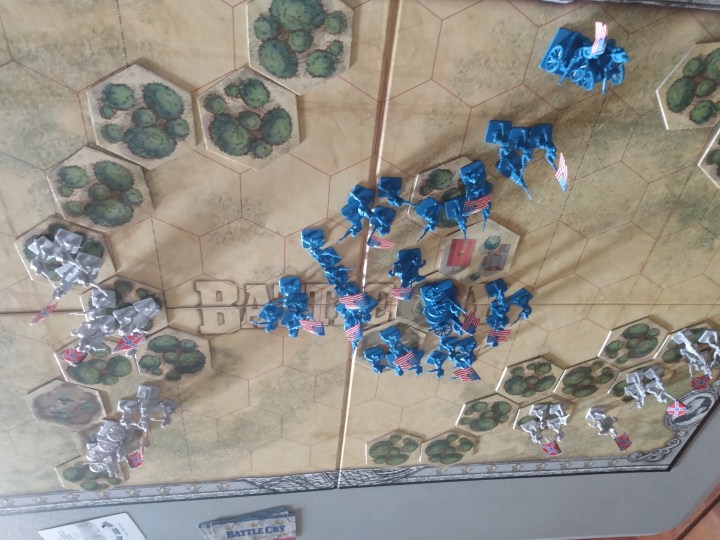
In the two-player game, the board starts with four Tripolitanian troops in each of Tripoli, Benghazi, and Derne (the three red circles left to right above), four Tripolitanian corsairs in the harbor of Tripoli, two Tripolitanian corsairs in the harbour of Gibraltar, and three American frigates in the harbour of Gibraltar. The solo setup changes this slightly: the bot gets an extra corsair in Tripoli and two extra infantry in Benghazi and Derne.

The 12 cards at the top left are the bot’s event card line and battle card line; the three at the bottom right are the American core cards. The bottom left has the Tripoli deck, with the U.S. hand face down next to it; the U.S. deck and discard pile are at the top right. This photo comes after the first U.S. turn, which saw me play “Naval Movement” to send two frigates to the Tripoli patrol zone and one to the Gibraltar patrol zone. (Normally, the U.S. options are to play a card for its effect, discard a card to move two frigates, or discard a card to build a gunboat in Malta. “Naval Movement” is a better version of discard to move two frigates, as it lets you move up to four frigates.)

Swedish interception.

One of the key early decisions the U.S. has to make is whether to play the core card of “Swedish Frigates Arrive” or not. This brings the two Swedish frigates (yellow) into the Tripoli patrol zone, where they’ll take part in interceptions of pirate raids, but not battles.

The upside is that this helps provide some early interception before the U.S. gets more frigates out there (the U.S. starts with only three, with one more set to arrive in each of 1802, 1803, and 1804, and two others available from the “Congress Authorizes Action” card). The downside is that this allows Tripoli to play “Sweden Pays Tribute” in 1803 or later, removing the two Swedish frigates and gaining two gold.

It’s not always worth it for the U.S. player to bring in the Swedes, with that decision often depending on your starting hand. In this case, it seemed worth it to me, and it certainly was in this Winter 1801 interception pictured above.

This took place on Tripoli’s turn, with the bot launching a corsair raid. A raid (one of the basic possible actions for both human Tripolitanian players and the bot) sees all corsairs from Tripoli move to the naval patrol zone. All frigates (U.S. and Swedish) then roll two interception dice each, hitting only on a six. Any sixes sink one corsair each, so my above roll (I had four U.S. frigates there thanks to grabbing my 1802 frigate via “Early Deployment” and moving the Gibraltar frigate to Tripoli with a discard after the corsairs there broke out) gave me four hits on 12 dice. That meant only three corsairs survived to raid.

American interception.

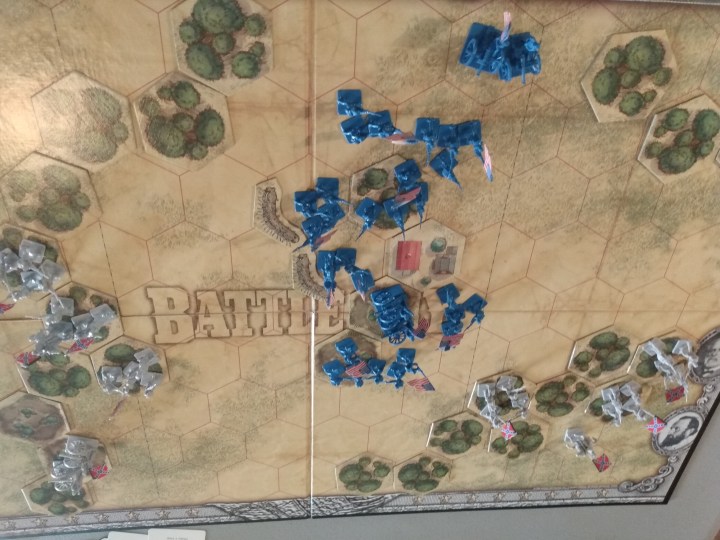
The game progressed from there, with the U.S. building up forces (including the three gunboats in Malta, which are useful in later bombardments and invasions) and Tripoli doing its own buildup and raids. The next critical moment came in the above photo, a Tripolitanian raid in Winter 1803. Here, the U.S. frigates rolled extremely well, sinking the entire Tripolitanian fleet.

Battle for Derne.

The interception success meant that I didn’t have to worry too much about Tripolitania reaching 12 gold, especially as they hadn’t had a ton of success before that. So the next key thing for me was focusing on my own victory conditions. The U.S. has two potential paths to victory, either successfully playing “Treaty of Peace and Amity” or successfully assaulting Tripoli, and it’s helpful to pick which one of those you’re going to focus on relatively early.

In this case, I targeted the treaty, so I needed to assault Derne. To do so, I moved a frigate to Alexandria in Spring 1804 (it’s ideal to do this late in 1803, but I couldn’t pull that off) so I could play “Hamet’s Army Created” in Summer 1804, then attacked Derne in Fall 1804 with the “General Eaton Attacks Derne” card (which I’d been saving since drawing it at the start of the game). Aided by frigate and gunboat bombardment, I took the city, but at significant losses (the two extra infantry in Derne the T-bot starts with relative to a human player adds challenge). And that further confirmed my plan of focusing on a treaty win, as I didn’t have enough troops left to slog through Benghazi and then Tripoli. (You can attack Tripoli without taking Benghazi by playing “Send In The Marines,” but it’s tough.)

Tunisia declares war.

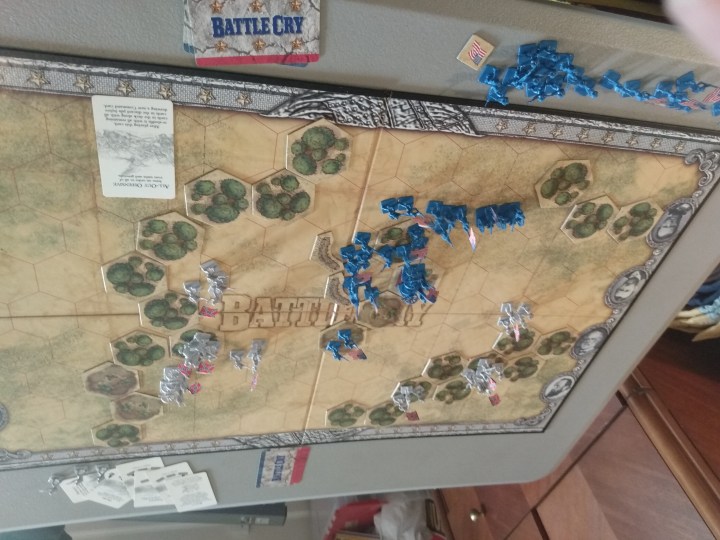
After taking Derne, there are two big issues for the U.S. to focus on in order to get a treaty win: taking Tripolitanian allies out of the fight and destroying the Tripolitanian frigate they get from “Constantinople Sends Aid.” This photo shows the Spring 1805 situation, with Tripoli playing “Tunis Declares War” right before that. I cancelled this with “A Show Of Force,” moving three frigates to Tunis and taking their allied corsairs out. This left not much blocking raids from Tripoli, but the bot didn’t have enough gold or corsairs for that to be a real problem. So that left the frigate.

Burn The Philadelphia.

There are a few potential ways to get rid of a Tripolitanian frigate without the full Assault On Tripoli. One is simply moving frigates into Tripoli’s harbour for a one-round naval battle. But this carries problems from play of “The Guns Of Tripoli” (and/or the Fortress Tripoli variant, which is being used in the tournament and which I’m now using in my regular plays (multiplayer and solo) as well), and also is a challenge if Tripoli has enough corsairs left to soak damage there.

The other path is from an event card. Both “Launch The Intrepid” (destroys one Tripolitanian frigate on a 5-6) and “Burn The Philadelphia” (damages one Tripolitanian frigate to the next year on a 3-4, destroys it on a 5-6) are options here, with “Burn The Philadelphia” being slightly better for these purposes (“Launch The Intrepid” makes up for that with its potential use against corsairs as well). “The Daring Stephen Decatur” enhances either of these by letting you roll two dice and choose one. I used “Burn The Philadelphia” with “The Daring Stephen Decatur” in Summer 1805 and rolled a 6, destroying the frigate.

Final situation.

This would have cleared me to play “Treaty of Peace and Amity” in Fall 1805, the first possible option. However, the bot pulled one of the only cards that could stop me in Summer 1805, “Morocco Declares War.” Fortunately, though, I still had “Tribute Paid” in hand, and the bot wasn’t close to its 12-gold win. So I played that in the fall, and then the bot got a card that didn’t screw things up on its turn, paving the way for my treaty (seen on the board west of Tripoli) in Winter 1805.

As mentioned off the top, one of the things I quite like about The Shores of Tripoli is the way each play tells its own story. That’s been noticeable throughout my tournament games, many of which have followed dramatically different arcs depending on card draw, player actions, and particular die rolls. Of course, it’s not quite as wide-open as some grand strategic scale whole-day games, but there are still six different outcomes here (the three Tripolitanian win conditions, the two U.S. ones, and a draw), and even many games hitting the same outcome have significant differences in how they got there. (Also, this game is appreciated for its full “Historical Supplement and Designer’s Notes” booklet in addition to the rules: this is well worth a read, and both the historical essay from Dr. Abby Mullen and the designer’s notes from Bertram add a lot to the game.)

And, impressively, this is true with solo plays against the T-bot as well. The bot has some predictability compared to a human player (which is offset by the extra resources it gets and its constant availability of its main events and battle cards), but it still has some uncertainty based off its card deck and based off how rolls go. It’s a worthy opponent, and one with impressively low overhead to operate. And it’s a fun way to play this game when you don’t have a human opponent around.

Advertisement

Exploring Chancellorsville through Battle Cry

The Battle Cry box.

The two most crucial days of the Battle of Chancellorsville took place on May 2 and 3, 1863, so this weekend marked an excellent opportunity to recreate it. This battle’s long fascinated me, especially with the divide-and-conquer flanking march through The Wilderness Jackson pulled off on May 2. And given that I don’t have a battle-specific game for this one at the moment, the Chancellorsville scenario in Battle Cry (the 1999 Richard Borg design that kicked off the Commands and Colors system, since seen in the likes of Memoir ’44, Commands and Colors: AncientsBattlelore and more) seemed like a good way to recreate it. Here’s a look at how the battle played out this time, with me playing both sides. For background info on Chancellorsville, the American Battlefields Trust page and the Wikipedia page are quite good; there was also a very funny thread from Matt Palmquist (@CivilWarHumor) this weekend, starting with a good map overview.

And for those unfamiliar with Battle Cry, it’s a low-complexity wargame where each side takes a turn playing one command card. Those cards usually activate one or more units in one of the three regions of the map. All moves are done before battles, and battles can be resolved in any order the activating player chooses. Infantry and cavalry can move and battle, artillery can move or battle, and generals can only move (but they can attach to other formations to give them an extra die). Battle involves just the attacking player rolling a number of dice; that number starts at five for artillery attacking an adjacent hex, four for infantry attacking an adjacent hex, and drops by one for each further hex away. Some terrain also reduces the number of dice the attacker gets; notably for this map, forests and hills drop the attacker’s dice by one, fieldworks drop it by two. All units always attack at their full strength even if they’ve suffered losses.

The Battle Cry box.

The six-sided dice have two infantry results, with the other sides being cavalry, artillery, sword and flag results. To record a hit, you need to roll the type of unit you’re attacking. Swords are wild (hits on anything), and flags force retreats. A hit removes one figure; infantry have three basic figures and a flagbearer, cavalry have two and one, artillery have one and one, and generals only have a flagbearer (but can only be killed if they’re attacked when they’re not attached to a unit and if a swords result is rolled). The goal is to eliminate six enemy units’ flags, and the flagbearer is always removed last.

And now, on to the game report in photos (a technique I particularly like thanks to Hiew’s excellent blog).

Chancellorsville scenario setup
The Chancellorsville scenario setup. Jackson’s forces are to the left (west), Lee’s to the right (east). Hooker’s troops are in the middle around the town.
First attack
The Confederates go first here, as you’d expect. The hand I randomly drew for their side started with an assault (activate all troops) card for Jackson’s wing, which was a nice note to history. The first assault wiped out the infantry closest to Jackson’s lines (probably part of Howard’s corps) and pushed the other forces near the south of the map back towards town.
Further success
The Union was unable to do much with their first couple of turns (seems historically accurate!), with one turn even being a discard and draw thanks to only holding cards that couldn’t activate anything. Some further Confederate assaults led to this situation. The CSA has already knocked out two Union flags and weakened some other units without losing much themselves.
Fieldworks
The Union army has had some rough card draws so far (and they’re hurt by only having three cards to the CSA’s five in this scenario), so they haven’t been able to do much attacking. But they did draw a fieldworks card, allowing the construction of two fieldworks around Chancellorsville. That gives those two units more defense (reducing the dice rolled against them by two). Unlike Hooker’s historical order for Sickles to abandon the earthworks in Hazel Grove, these units won’t be leaving these fieldworks any time soon.
All-Out Offensive
The All-Out Offensive card is the most powerful in the game, letting you activate all your units. The CSA drew it and used it to solid advantage, attacking with both Lee and Jackson’s forces in a move that feels like what historically happened in the morning of May 3. (Granted, at that point, Stuart was in command of Jackson’s troops after Jackson was hit by friendly fire the previous night.) You can see the mounting Union casualties at the top of the image, including four of the six flags necessary for victory; meanwhile, the CSA has only lost three figures and no flags. But this offensive did leave their troops more exposed outside of the woods.
Counterattack
Finally, some luck for the Union. They drew a Counterattack card, which copies the opponent’s last order. And All-Out Offensive is the best possible thing to copy, especially with several CSA troops now out of the woods and into the open. This turn sees the Union eliminate seven CSA figures, including one flag.
Probe
A couple of turns later, the Confederates have kept up their attacks, and they’re now one flag away from victory. They’ve also pushed the Union off both of the key hills in the middle, and forced the artillery to retreat to the buildings in Chancellorsville (and you can’t fire from a building, so that’s a useful result; it actually happened twice during this battle, with the artillery being pushed back there, moving back to the hill, and then being pushed back again). But the CSA has taken some heavy losses along the way, and the Union has done well to bring its northernmost artillery and infantry (likely Reynolds’ troops) into the fight. The flag score is now CSA 5, Union 3.
Sharpshooters
The Union has run out of useful attack cards, so they try to recreate the historical result of picking off Jackson (although that was by friendly fire rather than sharpshooters and happened earlier in the battle). But they fail their die roll, and he survives.
Final
The Confederates press for the victory with some much-reduced troops from Jackson’s command, and they get it, recording their sixth flag. But they did take heavy losses. Final score, CSA 6, Union 3.

Overall, Battle Cry is far from the most comprehensive simulation, especially when it comes to what units you can activate being limited by your cards and to wounded units still attacking at full strength. And as an overall war title rather than one specifically focused on this battle, it obviously doesn’t have as much particular chrome or orders of battle as you might find in a more narrowly-focused title. But I love this game for what it’s able to do with a rules-light, easy-to-teach-and-play approach, and the scenarios are very well-designed, making strong use of terrain and of differing hand sizes to give you some similarities to what actually happened in a wide variety of different battles. Playing out the Chancellorsville scenario this way was a lot of fun, and a great way to re-explore that part of history.

The Play’s The Thing: Monsters, economics, and time travel, oh my!

Here’s another installment of The Play’s The Thing, with quick mini-reviews of what I’ve been playing this week.

One Night Ultimate Vampire

Published: 2015

Designers: Ted Alspach, Akihisa Okui

Publisher: Bezier Games

3-10 players

10 minutes

We played a few rounds of this deduction game with six players at game night Tuesday. I quite like One Night Ultimate Werewolf, the predecessor to this, and ONUV has a very similar feel with a few twists. You’re still assigned a secret role, perform your role’s actions when called by the moderator (either from the game’s app or a non-playing person), and try to identify the vampire in a discussion and vote at the end, but there are some substantially different roles, and there are other differences as well. The main one is the ability for certain roles to hand out hidden marks, which can alter other characters’ teams, ability to take actions and more. The marks can be quite interesting in certain cases, adding some complexity and variation to the game, but they don’t always work out perfectly depending on which roles wind up in the middle. Overall, I think I’d take Werewolf over Vampire, and both are mainly an occasional filler for me, but this may be a good new twist on the game for those who play ONUW a lot and are looking to shake it up.

Transylvania: Curses and Traitors

Published: 2015

Designers: Loren Cunningham and Jamie Cunningham

Publisher: WIBAI Games

3-6 players

45 minutes

Exploring the board in Transylvania: Curses and Traitors.

We also played this Tuesday, and it felt a little underwhelming for me. Part of that may have been playing it with six, which substantially lengthened the time (it wound up taking closer to two hours than 45 minutes), and some of that may have been analysis paralysis on the part of one group member (who wound up winning despite that), so it may work better in smaller groups or with people more willing to take quick turns (it is quite possible with this). Even beyond this, though, this didn’t really work for me; there’s a feel of games like Arkham Horror or A Touch Of Evil, as you’re moving around and dealing with challenges to try and gain sets of cards in order to win, but there seems to be less strategy in this one. You don’t know what the challenges are until you flip them, so you can’t target ones that work with your character’s abilities, and none of the different locations really seem to offer much. There’s also a dramatic variance in the rewards from the cards. Some people never pulled any of the knowledge cards needed to win or anything that substantially boosted their abilities, while others got exactly what they needed. It also doesn’t really feel like there’s a chance for everyone to keep working towards a way to win. The twist of death possibly turning you into a monster and changing the win conditions is interesting, but this wasn’t a game I loved, and it’s not one I’d seek to play again.

Aeroplanes: Aviation Ascendant

Published: 2012

Designer: Martin Wallace

Publisher: Mayfair Games, Phalanx

3-5 players

120 minutes

Managing route networks in Aeroplanes.

I got to play my copy of this for the first time in over a year with some friends Thursday, and it was just as much fun as I remembered. Wallace is one of my favourite designers, and this is a very good design of his, translating the feel of building early airline networks very well with danger rolls for difficult routes, passengers needing to go all over the globe, and different planes with different capacities. There’s a money-balancing aspect, an area-majority aspect, three different eras of scoring, plenty of different strategies to target and much more. It all adds up to a pretty fun game for those who enjoy reasonably-tight economic Eurogames. I was edged out in the area-majority and profit scoring in the last round, but mounted a comeback thanks to some high-scoring passenger tiles (hurrah for Australia!).

Tinner’s Trail

Published: 2008

Designer: Martin Wallace

Publisher: Treefrog, IELLO, JKLM, more

3-4 players

60-90 minutes

Mining for copper and tin in Wales in Tinner's Trail.
Mining for copper and tin in Wales in Tinner’s Trail.

This was my first time playing this game, but it’s another very solid Wallace design. It’s about mining copper and tin in Cornwall, with a few neat twists; each area has water that makes mining more expensive, and there are various ways to try and drain the water (pumps, ports, trains and more) and increase your mines’ production, but all of those take substantial amounts of time. There are tensions about which actions to take and when, there’s tension in the price market (which fluctuates every round, and you always have to sell all the metals you’ve mined each round regardless of what the price is), there’s tension in whether to target known parcels of land in the auction or gamble on the ones where the minerals are yet to be revealed, and there’s tension in how much to invest and when (earlier investments bring more victory points, but may take money you need later). I wound up on top thanks to a great third round. I had a blast with this, and would happily play again.

Betrayal at House on the Hill

Published: 2004

Designers: Rob Daviau, Bruce Glassco, Bill McQuillan, Mike Selinker, Teeuwynn Woodruff

Publishers: Avalon Hill, Wizards of the Coast

3-6 players

60 minutes

Exploring the mansion in Betrayal at House on the Hill.

This was a great way to cap off game night Thursday; it’s another game whose theme works around Halloween, but for my money, this is one far more interesting than Transylvania. It has some of the same problems in that you don’t know what events will come up in certain areas, and there’s a lot of randomness, but it just feels much more fun. It’s scenario-based, and the first half of each game starts with you all just exploring the house before the haunt kicks in, but each haunt has very specific rules and ways to win, and the ones I’ve played through felt like they were well-balanced with good chances for both sides to win. The whole game feels very thematic, and it goes quickly; 60 minutes or less is an appropriate length for it. Moreover, there’s a ton of replay value, as many of the scenarios are quite unique; the one we played Thursday had one explorer having nightmares which were escaping the house, and the rest of us trying to wake him up before too many get out into the world. It led to a lot of tension, and us finally waking him up just before the final nightmare escaped. This was another solid play of this, and one that was a lot of fun.

Chrononauts

Published: 2000

Designer: Andrew Looney

Publisher: Looney Labs

1-6 players

30 minutes

Chrononauts after some timeline-flipping.

I covered this game a bit last week, but played it again with my wife Sunday and then played a couple of solo games Sunday afternoon. This is still holding up very well for me. The multiplayer game, which has three ways to win (align the timeline so you can get home, collect the artifacts to complete your mission, or just assemble power by gathering a hand of 10 cards), is a fun and often chaotic jaunt, with you each interfering with each other’s plans frequently. It’s much more strategic than Fluxx and its variants (also from Looney Labs), but it has some of that feel. The solo game, on the other hand, is much more controlled, but just as difficult; you have to get eight different time-travellers home in a single pass through the deck, which leads to tough decisions on when to flip which event. This carries the time-travel theme very well, and I’m not only happy to keep playing it, but will probably be looking to pick up some of the expansions down the road.

Thanks for reading! Have any thoughts on these games, or anything else you’d like to see on Board and Game? Leave them in the comments, or discuss them with us on Twitter or Facebook.

The Play’s The Thing: Clockwork customers, cosmos conquest, Cuban cigars, caught between cities and chronological campaigns

Welcome to another installment of The Play’s The Thing, a regular piece with thoughts on the board and card games I’ve been playing. Here’s what I’ve played over the past week. 

Steam Park

Published: 2013

Designers: Aureliano Buonfino, Lorenzo Silva, Lorenzo Tucci Sorrentino

Publisher: IELLO, Heidelberger Spieleverlag, others

2-4 players

90 minutes

The Steam Park box.
The Steam Park box.

My wife and I played this one this weekend, and we both had mixed feelings on it. There’s a cool theme of building a steam-powered amusement park for robots, and it incorporates real-time elements, die-rolling, resource management, bag-building and spatial placement into a design that’s still relatively light and fast. You’re trying to build a park that will leave you with the most money after six rounds, and you’re doing so with dice. Each face of the custom dice lets you do different things, and all players roll all their dice, locking in ones they want to keep after each round. You can reroll as many times as you want, but there are rewards for stopping and grabbing turn order tiles; once there’s only one tile left, that player takes a dirt penalty (dirt is bad, and can cost you the game entirely if you get too much or cost you money otherwise) and has just three remaining rolls to try and get what they want. Dice let you build rides or stands, play bonus cards for money, seed the bag and then try to pull visitors from it that match the colours of your rides, or clean up dirt. Rides let you attract visitors (who give you money each round), while stands give you special powers to manipulate your dice, your visitor draws, your dirt cleanup and more.

A closer look at my Steam Park.

All of this works quite well, but one big challenge is the spatial placement; the game rules only allow you to place rides or stands of the same colour adjacent to each other (and even then, they can only touch at one spot), while everything else can’t touch orthogonally or diagonally. You also can’t buy two rides of the same size in one round. Given how small the starting grounds are, this leads to a significant slowdown when trying to figure out how to optimally place rides, and also plenty of dice being spent on extra grounds to expand your park (but these don’t even expand it by that much, creating placement tension again). The idea of rewarding you for specializing in one colour (something that also works with the bag-seeding idea) isn’t bad, but this seems to be an awfully-finicky process for what’s generally a light game, and it feels very restrictive. (That could be easily modified with house rules if it bugs you, though, and the tension of placement may appeal to some.) A more minor knock is that the theme’s present, but could maybe be worked in more; each ride looks different (there are roller coasters, slides, etc), but they all behave the same way, so this isn’t necessarily a full theme park simulator. It doesn’t provide the same feeling for me as something like the great computer game Roller Coaster Tycoon. With that said, though, this is still an interesting game, and one that can be quite fun. You should just be aware of what it is and isn’t before buying and/or playing it.

An overall look at Steam Park.

Tiny Epic Galaxies

Published: 2015

Designer: Scott Almes

Publisher: Gamelyn Games

1-5 players

30 minutes

A look at Tiny Epic Galaxies.

Scott Almes is one of my favourite designers out there, producing the tremendous Kings of Air and Steam (one of my most-loved games), the brain-burning Harbour, the Tiny Epic series and a whole bunch of upcoming ones, including Best Treehouse Ever, Loop Inc., The Great Dinosaur Rush and more. I think he’s found another hit with this one; I’ve played it both solo and with a five-player group, and it shines in both settings. This is one of the fastest-playing 4X space empire building games you can find (Eminent Domain: Microcosm‘s even quicker, but that’s about it), and it has some neat mechanics; you advance in two resources (energy and culture, which let you reroll or follow others’ actions respectively), you can land on planets and immediately use their actions or go for the longer process of adding them to your empire through diplomacy or economics, and you can upgrade your empire to roll more dice and bring in more ships. The multiplayer game is great, and the solo game stands up to it, finding a way to provide a terrific experience (with variable difficulty levels) that keeps most of the feeling of the multiplayer game without too much fiddling. I played this one solo this weekend, and had a blast with it, as usual.

Another look at Tiny Epic Galaxies.

Mafia de Cuba:

Published: 2015

Designers: Philippe des Pallières, Loïc Lamy 

Publishers: Lui-même, Asmodee

6-12 players

10-20 minutes

My friends opted to open up game night with a seven-player game of this Tuesday, and it’s pretty interesting. It’s a social deduction game along the lines of One Night Ultimate Werewolf or The Resistance, but the difference is that each player gets to pick their role. A cigar box full of diamonds and role tokens is passed around, and everyone can either steal diamonds or grab a role. Each role has different win conditions, as you’d expect. The godfather then starts interrogating people to try and figure out who’s stolen his diamonds; loyal henchmen want to help, thieves don’t want to be accused, FBI agents want to be accused, and the driver wants whoever’s on his right to win. This was quite interesting for the first few rounds, but overstayed its welcome a bit for me; we opted to play a full seven rounds so everyone could be godfather (as where you are in the selection order does alter things quite a bit), and that felt like too much for me.

Between Two Cities

Published: 2015

Designers: Matthew O’Malley, Ben Rosset, Morten Monrad Pedersen

Publisher: Stonemaier Games

1-7 players

20 minutes

We then went into a seven-player game of this, and I loved it. It’s 7 Wonders-style card drafting, but you’re building cities like in Suburbia, and the twist is that you have to build two cities simultaneously, one with each neighbour. Your score at the end will be the score of your lowest city (à la Tigris and Euphrates, plus lots of other games), so you have strong incentives to try and advance both and to work with both your partners (and what they’re doing with their other partners). It plays very quickly, even with seven, and there’s lots of strategy involved both in what cards you place and where you place them. I wound up winning this one in the end. It’s not surprising that I had so much fun with this, considering that it’s from designers I quite like (Rosset did the great Brewcrafters, while O’Malley has done The Princess Bride: A Battle of WitsDiner, Knot Dice and more, and Pedersen is a Stonemaier developer who particularly specializes in creating solo variants) and a publisher with a great track record (I’ve enjoyed lots of Stonemaier Games’ different offerings, including Viticulture, and Jamey Stegmaier’s blog is terrific), but this was still a terrific experience.

One of my cities from Between Two Cities, mid-construction.

Chrononauts

Published: 2000

Designer: Andrew Looney

Publisher: Looney Labs

1-6 players

30 minutes

We split off into two groups to finish off the night Tuesday, and I played this one (I’ve been wanting this for a while, but just got it as a present from my wife) with two others. It’s such a fun time-travel game, with clever ways to alter and rewrite history and a great ripple mechanic. The multiplayer game has multiple ways to win, including acquiring the three artifacts needed for your mission, changing three moments of the timeline so you can get home, or accumulating enough power (10 cards) to dominate in the timeline you’re in, and it also has some excellent interaction between players as you each try to alter the timeline to what you need (and even that can change over time; our game saw President Kennedy flip-flop from dead to alive about five times, with the same player changing his status multiple times to take advantage of certain cards). It’s not a complicated game, and there is luck involved, but there’s plenty of strategy as well, and history buffs like myself will likely love it; there are very funny moments in this too, both from the cards and from player interactions. The solo game is also terrific, but very different, providing the challenge of manipulating the timeline to get all eight of your travellers home.

A look at the timeline of Chrononauts, set up for a solo game.

Thanks for reading! Have any thoughts on these games, or anything else you’d like to see on Board and Game? Leave them in the comments, or discuss them with us on Twitter or Facebook.